
Growing beans and peas is pretty simple – poke the seeds in the ground, water and wait. This time honoured method definitely works, and it’s what the majority of gardeners do. But this blog is about mixing things up a little, and thinking about legume growing techniques that will enhance your yields, encourage more vigorous plant performance and, for seed savers, help secure a harvest when you only have a small handful of rare or precious seeds to work with. This topic is especially useful for people who don’t have as much space for gardening as they’d like, and need to really maximize the space they do have.
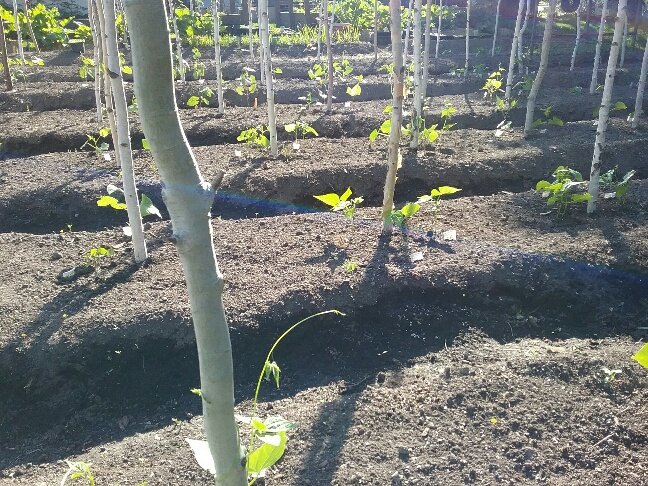
The first step to maximizing bean & pea yields is – to let go of all that you’ve heard when it comes to growing legumes! And one of the first things to leave behind is the idea that you can’t use transplants. Yes, much as it isn’t standard practice, beans and peas can definitely be successfully started in pots and trasnplanted a month later into the ground. In fact, I actually recommend it for pole beans in particular – if you want a jump on the season so you can start eating your green beans a full 30 days earlier. In fact, I see more and more greenhouses selling these plants along with the tomatoes & peppers in 4 cell packs. For those who’re interested in saving seeds, transplants are also a great idea. An extra 3 or 4 weeks growing in a starter pot before plant out will most certainly increase your chances of getting the seeds all the way to maturity without problems, even in a poor season – which is aways a wild card. Given that fall rains can be a real problem in drying down bean pods, this head start can make a real difference to seed savers.

Transplant day for some of the beans.
If a bean seed or seedling is going to be challenged by scorching hot weather in early summer, as we had in 2023, or excessive rains in early summer, as I had in 2021, having the bean seeds in starter pots will allow you the ability to protect your seeds & young seedlings in a way that you can’t if they’re in the open ground. Good sized transplants put into the garden can handle crazy or extreme early summer weather so much better than seeds as well. It’s also much quicker to plant bean seedlings than it is to put in seeds. When you only have a small amount of seed to work with, this is the best way to ensure their safety. I don’t use transplants as much with peas, unless they are extremely rare and I have only a very small quantity to work with – then I use transplants. But I do use transplants every time I grow fava beans, pole beans, soybeans and any kind of alternative legume like cicerchia. Legumes tend to take off very quickly when they’re put in as transplants.
The next typically overlooked technique with legumes is pinching! Yes, clipping off some of the tips in the early stages of growth! This works especially well with peas, but it works great with pole beans too. It causes the plants to branch, and double up thier vegetative efforts, and therefore have more vines to produce pods. It really does work and in 2023 when a rare pea sample I received from another grower produced only 3 viable seeds I pruned the vines 2 or 3 times in early summer to maximize the branching, and was able to collect a great deal of seed considering I only had 3 plants. Of course, this all makes sense given that pruning generally has this effect on all plants, causing them to flush with growth. For some reason it’s never done with beans and peas – with the possible exception of sweet pea flower exhibitions in England, where the vine tips are each carefully pruned to encourage growth.
Being in a shorter season area here in Northern Ontario, I initially worried that tip snipping might set back my plants time wise, but I’ve never observed this to be the case. Afterall, we’re only talking here about a small growth tip clipping once or possibly twice very early in the plants’ life. And if transplants are used, then even more cause to not worry about time lost. I consider it actually somewhat of a shame that this practice is not more widely known, especially with peas, because peas often finish earlier in the season than beans and pruning a little will definitely help to widen the harvest window and increase the yields. The increased foliage is also more ideal for the plants in a hot, dry summer as they can shade themselves at least a little.
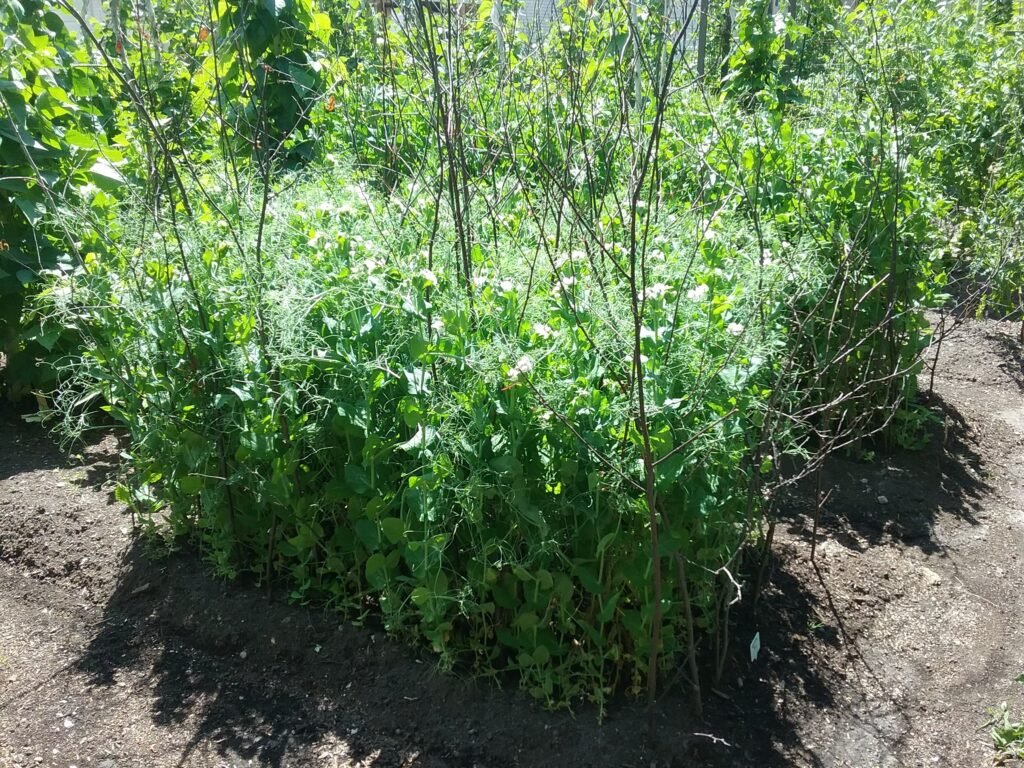
A third aspect of successfully growing beans and peas is the idea of good support. I have found that plants which are supported properly will produce much more than plants that are not. Even low rider peas like Tom Thumb I give support to because I’ve found it increases the yields considerably. Some low growing peas can self support each other, and if you have a lot of space it can be done that way, but I try to maximize production per square foot so giving support is essential. For peas, I like to mimic what ancient peas may have done – grow up on nearby vegetative matter, so I’m fond of block planting peas using ‘pea sticks’. These are twigs I choose (usually about 3 or 4 feet tall) which are quite branching and I poke them in among the plants so the whole area grows up clinging to them. Once the peas are at maximium height you can’t see the twigs anymore (the twigs can be clipped too) and you have a perfect block of what looks like magically perfectly upright plants. It’s very simple – no strings, no chicken wire, and I can break all the twigs up in fall and despose of them in the compost easily, or just burn them.
Pole beans are sometimes overlooked because people have come to consider supports for them a hassle. While I concede that, yes, it does take a little time to set up a support for pole beans, the benefits of pole beans over bushes is considerable. The quality of green beans from them tends to be higher and the yields of bush beans are quite small compared to pole beans, plant per plant. Yields from pole beans can be remarkable if they’re kept well picked. I’ve had die hard bush bean growers be shocked trying one of my pole bean transplants and seeing how different the cooked pods are in tenderness and meatiness. There are indeed some nice, tender bush beans out there, but generally speaking, the quality is better in pole bean pods because they don’t mature quite so quickly generally. As a rule, the longer a vegetable takes to mature the more flavor it’s developed.
The set up doesn’t have to be difficult; for some odd reason growing pole beans on actual poles has become an uncommon practice. Personally, I don’t use teepees or a trellis anymore – just a single pole stuck 2 feet in the ground, with all the branch nubs left on. I’ve seen people use their discarded Christmas tree from December with the branches sawed off to great success. I use a metal bar and drive a hole in the soil 2 feet deep, then push the pole in (which is usually a small birch sapling) and then tamp the dirt around the base. I’ve never had a pole fall over, ever. I’ve had them break due to the incredible weight of the foliage and pod load, but if you are using a younger sapling they have give to them and will bend rather than break. Some people I know use lumber yard 2 X 2’s and drive them in with a sledgehammer. A few screws sticking out the sides to mimick branch nubs helps to stop the vines slipping down in high winds. The look of pole beans too is quite beautful, several lushly covered poles looks like a symphony of vegetable beauty!

Given that legumes can fix much of their own nitrogen adding fertility to the rows is also not common practice, and some people have even had problems with adding chemical fertility to the bean row and getting lots of leaf growth and no pod formation. I have found 4 amendments that work wonderfully in my garden for beans and peas. Electroculture would be the first one on the list and I wrote a separate blog about my results with that. In terms of actual soil amendents I have found 3 additions to really help increase my yields, and I apply them only once at planting time: azomite, kelp meal, and alfalfa. A little goes a long way and learning about these additions was the first step in my climbing out of ‘regular’ yieds and starting to achieve above average harvests. Azomite in particular seems to be a boon to legumes, and beans in particular, as beans are quite sensitive to mineral deficiencies in soil. I have gardening friends who’ve tried glacial dust, often thought to be synonymous with azomite, and had no change in thier bean results so I only recommend azomite. I don’t think there are any real substitutes for it out there.
Lastly, the jewel in the crown of magnificent legume harvests is : pest control. I know, I know, nobody thinks they have bean seed flies! But Delia platura has no geographical limitations across North America and she is out there. Most people haven’t heard of this pest because none of the damage is above ground – it’s seen almost exclusively in poor yields and what appears to be poor germination. People often attribute these outcomes to weather…incorrectly. These flies have several life cycles over the course of the summer, and they attack in numbers when there are spells of cool, wet weather or if the soil is rich with decaying organic matter and/or manure. If you have bean seeds emerge without a proper ‘head’ (just a stem) or the cotyledons are damaged or have brown little marks on the new sprouts, you have seen the most you will ever see of thier visit. Often they simply eat the seed in the ground. The flies smell germinating peas & beans and lay eggs on the soil where the smell is, the tiny larvae when born will burrow into the seed and eat enough so that the seed may never sprout, or will sprout damaged. The maggots mature quickly, in days, and by the time you think ‘hey, why isn’t the bean coming up?’ she’s gone and is now an adult getting ready to plant her kids on your next row. And this pest will eat the roots of almost any garden plant, onions in particular.
Transplants are a great way to start your seeds off without tempting these pests to your seeds. I have tried both coffee grinds and wood ash as preventative organic deterrent (there is no chemical deterrent either) though electroculture has worked the best of anything I’ve tried. Wood ash seems to work second best, and after setting out transplants I will liberally sprinkle both the ash and the black wooden burned chunks onto the soil. Apparently, the smell and the pH of the wood ash is inhospitable to them and it seems to work fairly well. Deterring this pest, even from your mature plants, can be the difference between a ho-hum harvest and a bumper crop.